GPL Track Creating - Textures & Mips
Authored by the GPLEA
Contents
Making It All Look Good - The Business of Textures
Overview
You can make a new GPL-track as great as Alexander the Great, but without good looking textures you end up with something looking rather kack. The textures in GPL are small files based on bitmaps called 'mip' (Multiple Image Pictures). These images are 'mapped' or displayed on objects in various ways, governed by lots of rules.
Making the images work in GPL is quite easy due to the excellent tools developed by Phil, Nigel and Klaus, but the hard part is the overall design and layout of things - the true art. The guy responsible for textures needs to work in total cooperation with the track/3do makers, and do some Bossing around. There are lots of things to consider, and plenty of ways to do this, so I'll do this from a rather simple view: my own. Many talented artists are out there, and there will be faster/better ways of doing this, but I enjoy it, it's a real joy to sit back and see it all come together after starting out as a flat piece of grass/asphalt! This is the most rewarding part of track creation.
How is it done?
As I said; making the mip is easy. The process, explained in few words:
- Draw the texture
- Save it as a .bmp in the chosen number of colors.
- Using one of the mip tools, make the mip from the bmp, at the same time deciding repeating value and transparency
- Make a track or a 3do and view it :o)
Defining the MIP
A Mip has certain properties, they are all important, and they must all follow specs. Here are the important ones:
- Size
- Texture
- Transparency
- Repeating value
- Colors
Planning ahead
Always try to plan ahead: can you use this mip in several locations? How does that affect the properties? How does the brightness and contrast fit in with the rest of the graphics? Is the pure texture size optimized?
The best way to start out, is by deciding the seasoning from the start. Think about the following:
- Which time of year is this? Should the trees have leaves? Yellow grass? Flowers? (oooh!)
- Is the circuit & surroundings worn, or perhaps everything was brand new in the day you're replicating?
- What's the weather like? Is it sunny? Overcast? Wet? Blizzard?
- Are there much 'dark' areas? Shadows?
- What kind of vegetation is right for the area? No palm trees in Scandinavia!
...and so on. You get the idea.
Size
You've probably seen the excellent dashboards from the GPL Spares Factory. The reason they look so highly detailed, is that huge bmp's (and therefore mips) are used. Well, this gives a new challenge: how does this affect GPL?
Using these mips (their size, in pixels, is 512x256) will not work on 3Dfx graphic cards because they simply don't support textures bigger than 256x256. So keep this in mind. The size always has to be the power of 2 for a mip to work, here are the most common sizes: 256x256, 256x128, 256x64, 256x32, 256x16,128x256, 128x128, 128x64, 128x32, 128x16, 64x256, 64x128, 64x64...and so on. Any deviation from these sizes, and the mip tools won't work, or if you should manage it anyway, You'll get the dreaded 'Could Not Load Track' error in GPL.
There is a catch - the bigger textures you use, the more energy they suck out of your gfx card, and frame rate drops. For instance, if you're making a wall, try not to use one huge mip, but rater small, repeating ones, using bump-mapped textures. More on this later. But using a small texture will look bad when close-up because it gets pixilated, there is too little detail. This is something we just have to live with in these days. Not quite real-life just yet!
Repeating Value
You will want to use repeating mips, this is coded in the mip itself when using one of the tools. A mip can either be told to repeat sideways (nice for a barrier), upwards (telephone pole), or both (brickwalls on a building). This is how you can get away with the grass and asphalt; the same texture repeats itself and fills that wall in your track.
TIP!: The 'stretch' or sizing of the textures is set in the .tex file. If you have a barrier, and set it to stretch 10.0, this will look fine on the straights, but awful in corners. Fix this by having another tex entry using the same mip, but with a smaller repeating value calculated roughly by the radius of the turn, example 7.0.
The repeating value is also governed by the unk 4 values in GPLtrk, you can tell trk23dow to repeat it once from left to right, once the entire section, etc etc. read the section on walls to learn.
If you have set a repeating value for a mip, and it still looks odd, try making it repeat the other way, and then check the GTK for the unk 4 value if it is a texture on the track itself.
Colors
The original GPL mips are 99% 4-bit mips, that means a palette of 16 colors or less for each texture. These are good for FPS, but often can look like gnorphywooba. You can make great looking 16-bit mips (woohoo, millions of colors) but these will take up some resources on the gfx board, and on certain cards may not look to good, become blurry and so on. So do some testing. For some textures, 16-bit is the only way out. D3D cards, like the GEForce, converts all textures to 16-bit anyway, and with 3Dfx bought out (sob!), the number of colors may not matter that much in the future. But try and make them in 4-bit, you will be surprised how good they look in GPL, and performance is great. Later I will explain how you can make a 4-bit texture look snazzy!
Transparency
There is a lot of possibilities working with variable transparencies in 16-bit mips in conjunction with polygon colors and so on, but I have yet to experiment with that, save for the groove mip.
Tip: get a nice groove from somebody else!
You are allowed one transparent color in a mip, this is set in the tools. For the 16-bit mips, you’ll also need to make a texture in 2 -colors which works as a transparency map. More on all this when I try to explain the tools.
Let's make a mip, and go through the process of using the tools.
Making a Mip From Scratch
As an example, I'll make a 16-bit mip (this is with loads of colors), and it is intended for a wall with height, and will have transparency. The texture is the ruin wall to the left of the pits at Crystal Palace.
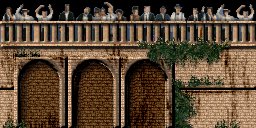
Here is the bitmap. The size I've chosen is 256x128 pixels, designed to repeat sideways. Everything except the people are hand drawn in Paint Shop Pro 6 (head over to www.jasc.com to get a free demo). You can cheat a bit with having a nice stone texture to start with.
This mip was for the high-resolution version of Crystal Palace, so to make it look at all good, I needed to make it 16-bit, but I wanted to have the background behind the spectators on top transparent.
So I had to make this mask for the mip, the black being the transparent area. To make the mask, I usually mess around with brightness/contrast, reducing colors and so on, until you end up with the right look, then fill with white and black respectively.
MipMan!
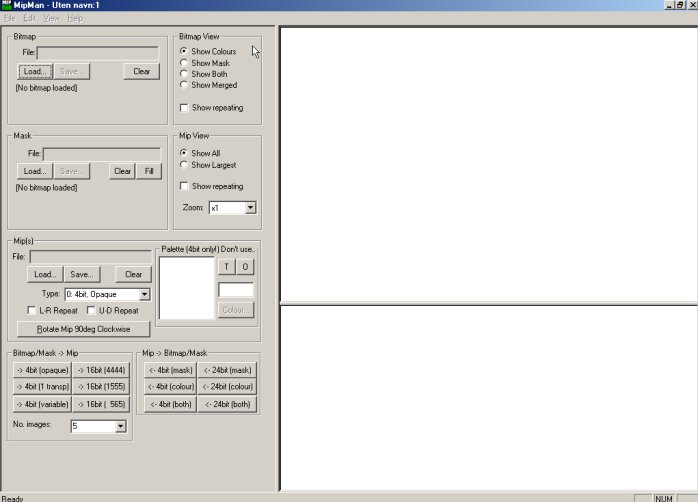
To make a the mip, get MipMan, a tool I rate as the nicest for making 16-bit ones. Here's the interface:
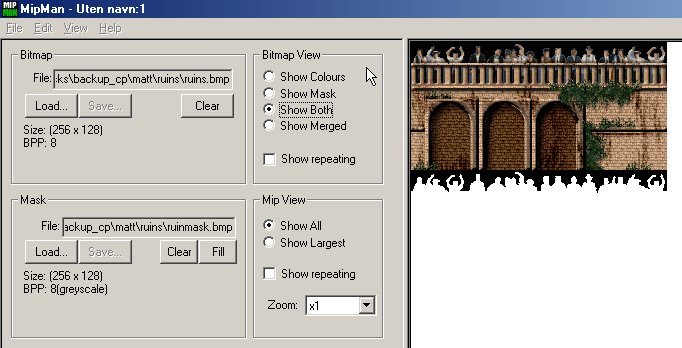
The interface may seem scary; but it isn't; there just is a lot of functionality! Start by loading your texture and mask. Then it should look like this:
Here I've selected "show both" - this displays both the texture and mask, you have other choices too. But now we're ready to convert..
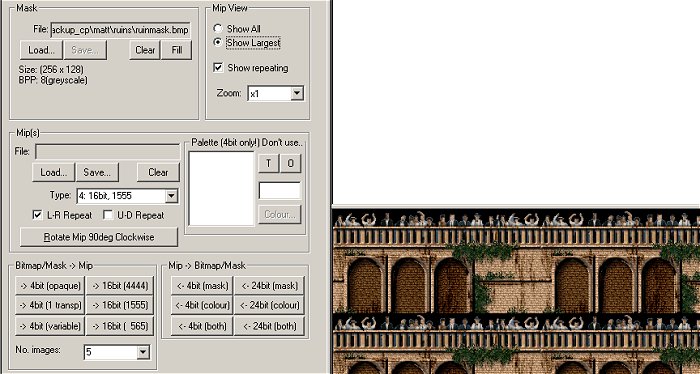
MipMan now reads the transparency from your mask, and by choosing type (16, bit, 1555), ticking off on L-R repeat (doh! Left-right repeat!). I now have the mip. There's one selection more you should mind: To the left, on the bottom: No. images: this sets how many sub-images GPL sees, or that are used in the mip. A higher number makes it look awesome from all distances & angles, but the mip becomes BIG and FPS Poor. So try and keep it low! But it has to be higher than 0!
To see what it looks like repeating: click on show all then show largest, then tick "Show repeating". You can mess about with all the settings and convert to your hearts content here, then remember to SAVE it with a proper name (not more than 7 characters by the way else you'll not be able to pack a DAT file later on. And presto! You have a mip! My preference is MipMan for making mips from scratch, if you already have the mip, modify the texture, and convert, Klaus Hörbrand's WinMip is the tool since it has a great batch function for converting from MIP to BMP and vice versa. So let's look at WinMip!
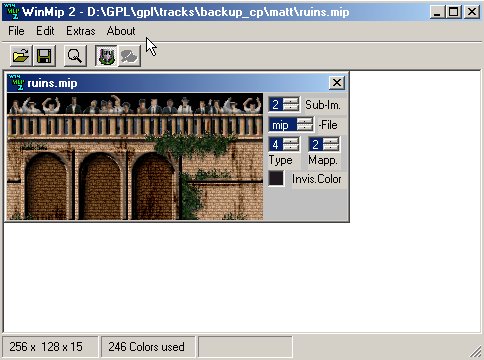
Here's my ruin opened in WinMip. The first law of WinMip: always have a mip with the same name as your BMP if you are converting BMP->MIP, WinMip reads info from the "old" mip when converting. You can of course cheat, use a mip you know is repeating, draw a new texture, give them the same name (new.bmp & new.mip), put them in the same directory, and convert. In this view you can change a few things, I suggest you load a mip, and change them and see what happens.....:)
TIP!:To make sure that your track will run in software mode: the field marked Sub-Im MUST NOT be 0!
If you're working in 4-bit, you can create a new Mip in MipMan in much the same way as I did the 16-bit one, drop the mask, and chose the 4-bit option on the converting buttons.
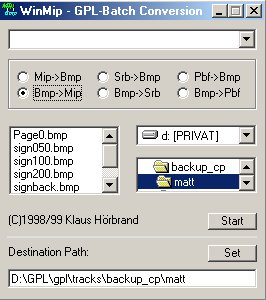
In WinMip, from the top menu, choose File->Batch Conversion. You'll get the Batch interface:
Here it is! Powerful! By ticking the radio buttons you can choose different jobs, mip->bmp, bmp->mip. Converting both ways, and you select the mips/bmps in the browser window (you can select several at the time standard windows way by pressing CTRL, or bu click & drag). First you must find the right directory, then press the SET button. This will dump all results in the folder you have set. You can browse a folder, set it, and go convert it from a different folder if you so wish. I recommend keeping the mips/bmps in a separate working directory, and take backups along the way. If you've done something wrong, WinMip answers to this in a proper way; throws an error message (In German, and even though my German is bad, they always make more sense than the standard MS msgs!) and quits. WinMip is very nice for batch converting both ways, and it also has a neat-o feature under "extras" that unpacks/packs DAT files.
Beware: WinMip reads info from the old mip, and that includes all the properties. You can make a new size no problem, but WinMip will use the repeating value, number of colors and the transparent color from the old one. And don't try to convert using a 16-bit mip and a 4.bit bitmap :o)
More talk...
This should have been all the introduction you need. The appearance of textures are down to preferences in the end anyway. You also stumble into other files, called SRB. Making SRBs is very much like making mips, the same laws apply, and you can use WinMip or SRBMAN. But the SRBs have some functionality you should read up on in conjunction with 3dos. Basically, an SRB is a MIP that always looks straight at you, and is used for the flagmen and the animated objects. They also need a 3do.
So are there any secrets?
Nope, just work. When making textures, a digital camera is nice to have, some skills in Paint Shop Pro or Photoshop, tons of pictures, video, whatever you can get your hands on. The GPLEA have taken pride in thorough inspection of the tracks we have created (and it's fun to meet up with your netbuddies too!) And by that I mean pictures taken on-site used as textures as far as possible. You need to plan a bit, and work with the rest of the track; fake some shadows, use variations on themes (several types of grass) and so on. So get to work....
Updated 27-Jan-2001
Transfered to the wiki: 17.04.2009
