Difference between revisions of "LOR Trackguide Kyalami"
Bernd Nowak (Talk | contribs) (→Downloads) |
Bernd Nowak (Talk | contribs) (→Downloads) |
||
| Line 289: | Line 289: | ||
==Downloads== | ==Downloads== | ||
| − | [[File:GPL_trackguide_Kyalami_by_LOR.pdf]] | + | |
| + | *[[File:GPL_trackguide_Kyalami_by_LOR.pdf]] | ||
| + | *[[File:kyalamiall.zip]] | ||
[[Category:GPL]] | [[Category:GPL]] | ||
Revision as of 13:58, 29 March 2009
Contents
General
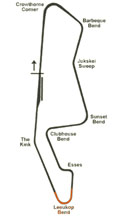
The 2.544 miles Kyalami track in South Africa is a good mixture of fast sweeping turns, tight hairpins, and one very long straight. It is one of the most modern tracks in Grand Prix Legends, with lots of run-off room and curbs at all the turns. There are quite a few passing opportunities, the most obvious of which is at the end of the very long front straight. As most of the straight is uphill your top speed at the end is not that fast. Good trail-braking skills are important here in order to get the car turned into the corners quickly. Other than that the track is not too difficult. Being smooth and keeping to the correct line is the way to be fast here. Pushing too hard into the slower turns will slow you down as you struggle to get the power down at their exits. As far as racing goes, it can be quite fun, with the draft playing an important role down the front straight.
CAR SETUP
Kyalami needs a fairly neutral setup. The track has some very fast turns and some medium to slow tight turns. This means you can't really go to one extreme or the other when setting up your car. Understeer will make it very difficult to get through the fast turns, and oversteer will kill you under braking into the slower ones, and possibly exiting the fast ones. So aiming for a neutral setup is a good starting point. Once you develop a good feel for the track, you may want to tweak the car in one direction or the other, but just slightly.
The slow corners, like Clubhouse Bend and Crowthorne Corner, need a car with good grip to get the power down on the exits. Setting the shocks up on the medium/soft side will give you the grip you are looking for. I have the rear slightly stiffer than the front to help in turning into the corners. For the long fast sweepers it is a good idea to have the roll bars be a little stiffer than the shocks. This should help you get through them without scrubbing off too much speed.
Gearing is a little harder than most tracks here as there are two distinct ways to go. There are two corners that decide how to set second and third gears. This then dictates the rest of the gears. The stretch between Clubhouse and the Esses is where you set second. You can stretch second gear so that you are just able to stay in it for that entire section (my choice) or set second gear so that you have to change into third before reaching the esses. If you do this, then you should make second fairly short so that you are in third for more than a second before reaching the esses. The disadvantage to this is that you have to make an extra gear change, and also second won't work as well for you exiting Crowthorne Corner and Barbeque Bend. So assuming you set second up to take you all the way into the esses, you can use Jukskei Sweep to set third. You should almost hit red line in third before getting to Jukskei Sweep. The front straight is where you set fourth and fifth. There are two places to change from fourth to fifth. First is just before the Kink, and the second is just as you reach the high point of the track at the start/finish line. Depending on the power and torque of your engine one of these will work best for you, so some experimentation is required. You don't want to be bogged down in fifth as you go up the hill from the Kink to the start/finish line if your engine can't handle it. Fifth should take you all the way into Crowthorne Corner, hitting redline just as you get to the braking point.
GOALS
You should aim for a qualifying lap of about 1:19.50 to 1:20.50. That should put you pretty far up the grid. During the race you should aim for 1:20.00 to 1:21.50, depending on fuel loads, for your lap times if you don't encounter traffic.
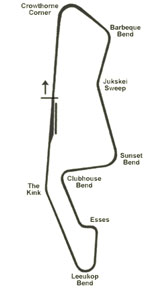
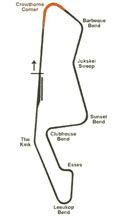
CROWTHORNE CORNER
- Entrance speed: approximately 190 mph [306 kph]
- Speed through the corner: approximately 65-70 mph [105-113 kph]
- Arrival time at the corner: 6.94 seconds
- Time to negotiate the corner: 8.51 seconds
- Exit time of the corner: 15.45 seconds
Entry
After crossing the start/finish line the first corner is Crowthorne Corner. You'll approach this flat out after the very long front straight. It presents a great overtaking opportunity as there is a lot of time to set up the pass. Just make sure you don't brake too late or you'll be taking a brief trip across the grass. There is a significant curb at this corner, which you don't want to hit at any point as it disrupts the balance and grip of the car.
Apex
You'll be in top gear going flat out coming into Crowthorne. Position the car on the left side of the track. There is no definite braking reference point for this turn, so a bit of guessing is involved every lap. The track is going downhill into the turn. Continue under full acceleration as the racing groove darkens. The track flattens out slightly at about the same time as you get to the crowds of people on the right. You can't actually focus on the people on the right as you come into the turn, so you need to feel when the track begins to flatten out and use this as a braking reference point.
Just before it flattens out, brake as hard as possible and start to shift down to second gear. Continue in a straight line as you slow for the turn. As you get to the end of the embankment on the left turn into the corner a little, aiming to hit the curb early. As you turn in, ease off the brakes and the car will rotate the rest of the way into the corner for you. Hardly any steering input is required here. You may need to use the throttle to balance the car into the apex.
Exit
Keep the car tight to the curb through the corner. Use the power to keep as much speed as possible, but don't slide out from the curbing. If you accidentally get a wheel onto the curbing, you may have to back off slightly to regain traction. The corner tightens up slightly as it nears its exit, so increase your steering input to compensate. Make sure you don't get back on the power too soon or you'll go quite wide on your exit. Once you see the track straighten out ahead of you, get back to full power, and let the car move out to the left side of the track. Get right next to the curbing as you exit, but don't touch it.
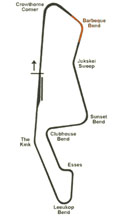
BARBEQUE BEND
- Entrance speed: approximately 120 mph [193 kph]
- Speed through the corner: approximately 80 mph [129 kph]
- Arrival time at the corner: 17.95 seconds
- Time to negotiate the corner: 4.03 seconds
- Exit time of the corner: 21.98 seconds
Entry
Barbeque Bend comes quite soon after Crowthorne. It also has curbs, which you want to stay away from as you negotiate the corner. Even though there is not much space between Crowthorne and Barbeque, an opportunity to overtake exists if the car ahead got out of shape on the curbs through Crowthorne.
Apex
Depending on your gearing you may be able to get into third before this turn. You'll be lined up on the left after the previous turn's exit. Continue under full acceleration until just after the racing groove darkens. Then brake heavily for a moment and shift down to second if necessary.
Exit
You need to turn in to this corner slightly earlier than you would think. As you turn in, ease off the brakes and get the car to rotate into the apex, which is about mid-corner right next to the curbing. If you can't hit this point of the corner without slowing excessively you are probably turning too late. Just before you reach the apex, you should be finished braking. Use the power to balance the car for a moment as you pass the apex. Once past it, get back to full power and let the car drift out to the left side of the track. Don't be in a hurry to get back to the right. You may be in a slight four wheel drift exiting orts to turn the car to the right too soon may induce a spin, especially if you get a wheel on the dirt. So let the car go in a straight line for a moment against the left side of the track before moving over to the right for the Jukskei Sweep.
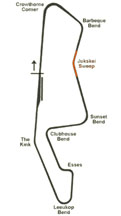
JUKSKEI SWEEP
- Entrance speed: approximately 135 mph [218 kph]
- Speed through the corner: approximately 120-125 mph [193-202 kph]
- Arrival time at the corner: 25.70 seconds
- Time to negotiate the corner: 3.38 seconds
- Exit time of the corner: 29.08 seconds
Entry
The Jukskei Sweep is the first fast bend on the track, and one of the trickiest. This is where you will lose a lot of time if you go wide at the entrance or exit. So spend a lot of time getting this corner right and you'll see a big improvement in your lap times.
As you approach this turn you'll be moving across the track from the left to right under full acceleration in third gear. Make sure you get all the way to the edge of the track before you turn in. If you are even six inches away from the white line when you turn in, you'll go wide on the exit. So make sure you go right to the edge of the track just before you turn in.
Apex
There is no need for braking going into this turn. There is a slight dark spot on the racing groove as you approach the turn. Forget it, and continue under full power towards the turn. Then as the groove darkens again, just before the embankment on the right begins, shift into fourth gear, begin to turn in, and ease off the power. Try and keep a constant amount of power on from now through to the apex.
<br<
Exit
You should aim to hit the apex just after the curbing starts. Unlike the previous two turns, you can ride the curbs quite a bit here. Don't go completely nuts with it though, or you will get out of shape, but getting two wheels onto the curb is fine. As you leave the curb and move towards the exit, keep the wheel turned and the power at a constant level. Then as you cross the dashed white line in the middle of the track, get back to full power and unwind the wheel, letting the car drift out to the right side of the track. As with the previous turn, you want to let the car stay at the right side of the track for a few moments before pulling back to the left, especially if you put a wheel off as you exit. Pulling across too soon may cause you to spin, so wait a moment before moving to the left.
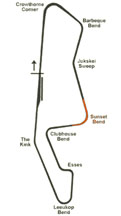
SUNSET BEND
- Entrance speed: approximately 143 mph [231 kph]
- Speed through the corner: approximately 85 mph [137 kph]
- Arrival time at the corner: 31.61 seconds
- Time to negotiate the corner: 7.76 seconds
- Exit time of the corner: 39.37 seconds
Entry
Sunset Bend, though not as fast as Jukskei, is another corner which will gain you a lot of time. After perfecting Jukskei I'd look here for more time. Also like Jukskei, Sunset Bend offers a good overtaking opportunity if the car ahead of you got out of shape exiting Jukskei. The entrance to Sunset is quite wide and allows you to try and go down the inside if you are on the gearbox of the guy ahead. But be careful not to drift out wide, taking you both out. However unlike Jukskei, you need to stay away from the curbs here.
You'll be in fourth gear under full acceleration as you approach this turn. Move the car over to the left side of the track for the entrance. The racing groove is fairly dark as you come into this turn and gets lighter for a bit just before the corner. It is at this point that you should brake. This is not a heavy braking zone. Brake moderately hard and shift down to third, while continuing in a straight line. If you turn in too soon, you'll have to slow down quite a lot too soon in order to avoid going wide at the exit. This is quite hard to do as it feels like you'll go off the track, but you need to stay to the left as you enter the turn.
Exit
The scaffolding on the left is a good turn-in point. Just before reaching it, turn in gently, easing off the brakes as you do so. This will help you turn get the car turned into the corner. Use the throttle to help keep the back end under you if you need to. You reach the curbing about midway through the turn. Because of the length of the turn it actually seems much longer before you get into the curbing. You should be done braking at this point.
As the turn begins to open up, gradually get back on the power. The sooner you get to full power the better, but be careful not to go wide on the exit. If you do, then you should be waiting a little longer before getting back to full power. The rear end will also tend to spin out if you get back to full power too soon. Let the car go out to the left side as you exit, making sure you don't ride the curbs here either.
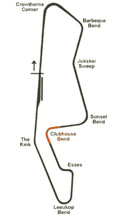
CLUBHOUSE BEND
- Entrance speed: approximately 120 mph [193 kph]
- Speed through the corner: approximately 55 mph [89 kph]
- Arrival time at the corner: 40.83 seconds
- Time to negotiate the corner: 5.62 seconds
- Exit time of the corner: 46.45 seconds
Entry
After the two previous fast corners you come to the slowest corner on the track, Clubhouse Bend. Like the previous two turns, this one also offers a good overtaking opportunity if the car ahead got out of shape through the last corner. The slow speed of the corner helps as you have more time to make your move.
You'll be moving in a diagonal line across the track towards the right as you approach this corner. By the time you reach the braking point you should have been able to get into third gear. It is quite easy to slide the rear end at this turn. This won't take you out of the race, but you will lose a little time. To try and prevent this from happening, do most of the braking in a straight line, and shift into first gear as late as possible.
Apex
The racing groove has a slight break in the dark line as you approach this turn. Use this as your braking reference point. Right after you reach this light section, brake hard and downshift to second gear. Keep the car going in a straight line towards the outside curb. Just before reaching the yellow and black stripes of the curb on the right, turn in and start easing off the brakes. Shift down to first when you feel the car is stable. If you change down too soon, the higher revs of the engine may lock the rear wheels for a second and you'll be sliding round the corner. If this happens, use the power to help correct it and get you going in the proper direction again.
You should reach the curb just after the first Ford pole on the left. Continue around the turn, hugging the curbing and using the power to try and maintain a constant speed. As you reach the third Ford pole start to get back to full power and begin to unwind the wheel a little. The exit happens very soon and you have to be ready to straighten the wheel out quickly. Stay in first until you have the wheel straight. When you do shift to second, wait a beat in neutral. This will help to prevent you from spinning the rear wheels when you get back on the power. Continue out towards the right side of the track to complete the turn.
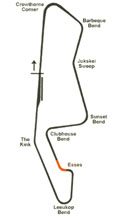
ESSES - PART 1
- Entrance speed: approximately 118 mph [190 kph]
- Speed through the corner: approximately 75 mph [121 kph]
- Arrival time at the corner: 50.12 seconds
- Time to negotiate the corner: 3.98 seconds
- Exit time of the corner: 54.10 seconds
Entry
The Esses are composed of a tight left hander followed by a more gentle right hander. They are separate enough to be discussed individually, however. You'll be on the right side of the track as you approach the left hander. Stretch second gear all the way into the corner. Shifting to third seems like a waste of a shift to me, as you'll have to shift back down almost immediately.
Exit
As the racing groove darkens brake heavily. The tricky part to this turn is when to turn in. There is no real reference point to use. If you turn in too early, you will probably run over the inside curb and get out of shape. Turn in too late and you'll go wide at the exit. There is a lot of run off room there, but you will lose a lot of time. All this means you need to develop a feel about when to turn in. You want to find a point that puts you in the middle of the track as you exit the turn. Remember that this turn goes downhill as well. Turning a little early is better as the car will want to slide out to the right on the exit, and if you are already wide, well...
You don't really need to get right against the inside curbs through this turn. But if you do, then make sure you don't start riding them as you'll get out-of-shape, and that will really not help you in the following right hander. Once you get straightened out after the turn you should be able to get back to full power momentarily before the right hander.
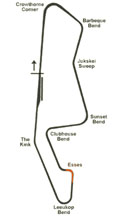
ESSES - PART 2
- Entrance speed: approximately 85 mph [137 kph]
- Speed through the corner: approximately 75 mph [121 kph]
- Arrival time at the corner: 54.70 seconds
- Time to negotiate the corner: 3.78 seconds
- Exit time of the corner: 58.48 seconds
Entry
The right hand portion of the Esses is much gentler than the left hander. The key to this is to stay close to the inside curb so that you can get the power down early as you exit the turn. You'll be in second in the middle of the track as you leave the previous left hander. The Bardahl sign on the left is a good reference point for turning in to the right hander.
Exit
When you reach the sign, turn in and brake slightly. You just want to lose enough speed so that you can get the car turned into the curb. You should get to the curb almost immediately. Once there use as much power as you can to maintain a good speed, but make sure that you don't drift away from the curb. This will get easier as you pass the midpoint of the turn as you now start the uphill climb to the start/finish line. This incline will help to push the car into the curb on the right, allowing you to get more power down. As you near the exit of the turn you should be able to get back to full power. Steer straight across the track as you exit. If you wait to move over to the left, the uphill slant of the track may cause you to spin your rear wheels slightly. This won't spin you, but will mean you have to back off slightly and therefore lose some time. Get right to the curb as you exit, but don't put a wheel on it, as that will upset the car.
LEEUKOP BEND
- Entrance speed: approximately 116 mph [187 kph]
- Speed through the corner: approximately 65-70 mph [105-113 kph]
- Arrival time at the corner: 1 minute 0.90 seconds
- Time to negotiate the corner: 7.00 seconds
- Exit time of the corner: 1 minute 7.90 seconds
Entry
Leeukop Bend is a long, fairly slow, right hander. It has a tricky exit as there is a big bump in the track which you need to avoid to get the power down quickly and smoothly. The entrance can also be deceptive, giving the impression that you can brake later than you should.
You'll be on the left side of the track under full acceleration as you approach this turn. Depending on your gearing you may make it into third gear. If so, remember to shift back down to second when you brake for the turn. After the previous few turns that did not provide any braking reference points, Leeukop Bend has thousands of them. Half way between the final Bosch and Champion signs on the left brake hard and make sure you're in second gear.
Apex
Once you reach the Champion sign, start turning into the corner and ease off the brakes. Use a combination of brakes and power to keep the car on the proper line through to the apex. Try not to reach the inside curb too quickly, as this means you'll have to slow down a little too much midway through the corner. You should be reaching the curb just before you pass the scaffolding on the right, making sure you keep your wheels off the curb. At this point start getting back to full power. As the turn straightens out aim for the left side of the track. You want to get there pretty soon. The inside and middle parts of the track slope down to the right significantly at the exit of the turn. If you get caught up in this you'll have to back off to keep the car under you.
Exit
The exit of this turn is very important as it will dictate your speed all the way down the front straight and into Crowthorne Corner. This is a very long way and the car behind you will have a long time to draft you if you make even the slightest error. So be smooth and avoid that dip at the exit.
The Kink ahead on the straight can be taken flat. Just start on the left, turning so that you run your right wheels just slightly over the curb, and then drift back out to the left. Try not to get any wheel noise as you don't want to scrub off any speed here. As you exit the kink, make sure you don't go onto the gray area to the left of the pits. Besides killing everyone's pit board guy, you'll actually lose a tenth because you have to make an arc down the front straight which is slower than going in a straight line. It also makes it difficult for the other cars near you to judge where you will come back onto the track, making things a bit dangerous.


