GPL Track Creating - Sections
Authored by the GPLEA
Contents
Straights and Corners
Your entire track is constructed from Sections - either straight lines or segments of a circle. Every section follows on from the previous one until you get back to the start of the track again ( no hill climbs or drag strips:-( )
Sections form the basic structure of the track - the altitudes are 'parallel' to the centreline defined by the sections, while the walls create the actual driving surface in each section. Creating sections in GPLTrk is easy, but you will soon run into problems when changing the layout of your track, and when you come to aligning the first and last sections.
Creating Sections
Start GPLTrk and create a New track (File->New). You will be given a single straight section - the gray block. Notice the red arrow - showing you that the cars will head in that direction (left, right, north, hubwards - absolute direction is irrelevant! All that matters is the overall shape of the track).
Ok, so we have a 50 metre long piece of straight (click on the gray block to get information in the top window):
Wow - what a track. Time to add another section. On the tree window (left in the pic above), right-click on Section 0 (straight), and choose Add After. You will be given a duplicate of that section - another 50m straight.
Corner->Straight->Corner->Straight->...
So far, you have 2 straight sections. Boring. Right-click on Section 1 (straight) in the tree view, and choose Change Section Type. Voila - a corner section, turning 20 degrees to the left:
Section Length
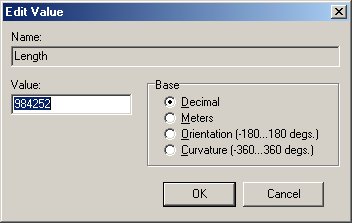
Look at the first pic - by double-clicking on the Length word, you will be given a dialog box to change the length of the straight section. This dialog box is used for all values in GPLTrk- it is recommended that you use the Decimal setting in preference to the Metres setting (greater accuracy). For corners, use Orientation for the starting angle, and Curvature for the angle change (both in degrees, where a positive value turns the section to the left, negative to the right). 1 metre = 19685.03937 in the 'Decimal' setting.
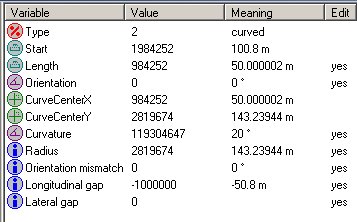
Change it to 1984252. Oops - the straight now overlaps the corner. We need to fix that, or weirdness will happen in GPL. See the Gaps section to fix the problem.
Corner Radius
Simple enough - this is the radius of the circle, that this corner is part of. Let's take a 10metre width track as an example- 5 metres will be either side of the centreline, where the radius is measured. Thus the radius at the apex will be 5metres less than the section radius, and the outer radius 5metres more. For most corners this is not a problem, but for hairpins, you must make sure that the section radius is sufficient to allow for the apex radius!
Also, very tight corners in GPL cause bad FPS - this is something to do with the distance between visibility boxes, which get squished the closer you get to radius=0.
Orientation
Usually, you will want to leave this alone, unless you have Orientation Mismatches (see later), or you are changing the direction of the first section. Value is in degrees, where 0deg is pointing ->, 90deg ^, 180deg <- and 270deg v.
Curvature
The curvature of a corner is the direction change, in degrees. A hairpin might change by 180degrees. BUT! you must not create corners with curvatures of more than about 120degrees, because trk23dow will throw a wobbly, and your track will be quite weird to drive (invisible bits, unexpected physics, etc.). Positive curvature makes the section turn anti-clockwise (to the left as you drive), negative is clockwise (to the right as you drive).
Gaps
For the track to be compiled correctly, and to *not* cause GPL to lock up or crash when you drive around, you must make sure that every section is aligned correctly with its neighbours. Taking the straight/corner problem we have created, do the following:
Select the corner section - section 1:
Look at the Longitudinal gap - it is -1000000, or -50.8metres. Double-click on the word LongitudinalGap, and change the value to 0 decimal. This will reposition section 1 so there is no gap (/overlap).
More Gaps
There are three types of gaps/overlaps you will come across - Orientation Mismatch, Longitudinal Gap and Lateral Gap. Note that section overlaps can sometimes be spotted because they cause spike in force-feedback steering wheels.
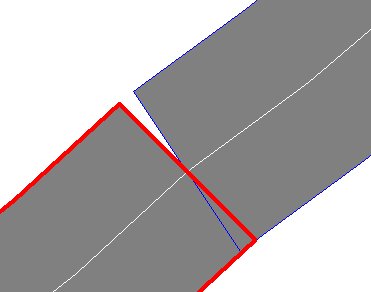
Orientation Mismatch - this means that this section does not have the correct Orientation value, when the previous sections' Orientation+Curvature values are compared. Look at this diagram - the sections clearly have a gap. Usually, this will be happening on a very small scale, but this is plenty to crash GPL, so make sure that all Orientation Mismatches are 0!
Orientation Mismatches can be fixed in one of two ways:
- If the preceding section is a corner, you can adjust its Curvature so that it fills the gap. Remember that the scale of Curvature is half that of Orientation, so if you have an Orientation gap of 1000, you will only want to change the Curvature by 500.
- Set the Orientation Mismatch to zero. This will require you to carry the mismatch on to the next section, so 1) is preferable.
Longitudinal Gap - means that the sections have either a gap (value is >0) or that they overlap (<0). It is ok to leave an overlap if it is small (500 or so), but all gaps must be corrected. Note - If you have an Orientation Mismatch, FIX THAT FIRST!
- If the preceding section is a straight, simply alter the Length of that section to fill the gap/reduce the overlap.
- If the preceding section is a corner, you can alter the Radius of that section. This will also affect the Lateral Gap, so use carefully to avoid making a bad thing worse.
- Set the Longitudinal Gap of this section to 0. Again, this will carry the Gap on to the next section.
Lateral Gap - a sideways mismatch. These gaps cause the fewest problems, but for a decent track you won't want any, so:
- Fix Orientation Mismatches and Longitudinal Gaps FIRST!
- Find a preceding corner section, and adjust the radius. This will also change the Longitudinal gap, so take care.
- Set the Lateral Gap to 0. If you have several pieces of straight, you can spread the Lateral gap out over all those sections. Here is an exaggerated example:
That Last Section
So, you've created a 40km track, and the last section doesn't match up. To fix this, follow the guidelines listed in Gaps. You might need to fix several consecutive sections (starting with the furthest away from the finish!), because you have:
- A straight as the last section - not much you can fiddle with here.
- A 'good' piece of track leading up to the final corner - i.e. you have known radii of the corners that can't be changed. Here you'll have to change the length of sections/curvature/radii etc. of sections that have significant effect on the end of the track. By this, I mean that changing the length of a section before a hairpin will be like changing the length of a section after the hairpin, because they are mostly-parallel.
Splitting Sections
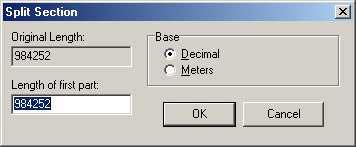
You have a long straight section and you really really want to have an escape road, or a different set of walls for half of it. Don't rebuild the track ! All you need to do is right-click on the section in GPLTrk's tree view and choose Split Section:
Give the length of the first 'half', and GPLTrk will split the section into two. However! If you have altitudes, GPLTrk will not retain the structure that *you* want - it will only make sure there are no altitude gaps, so you will probably end up with a sharp angular piece of track.
Section Lengths
Don't create too many sections for your track, and make sure there are not a large number of short sections (20 metres or less). As an example, Goodwood is 99 sections over 3.8km, which is quite a lot. Solitude is 175 sections and 11.4km which is about right. The original Papyrus tracks range from 26.9 metres-per-section for the Nurburgring to 87.1 metres-per-section for Monza. The 'Ring is a bit of an exception, because the scenery is relatively dull, with few buildings, people etc. For your tracks you should be aiming to be in the 50metre-per-section range, but always avoid lots of short sections, especially tight corners!
Transfered to the wiki: 16.04.2009


